You flip the switch and hear a hum — but the disposal is not grinding. Or worse: nothing at all. Before you call for service, know that the majority of garbage disposal problems are simple jams or tripped overload protectors, fixable in ten minutes with no electrical work. The key is following the safe sequence and knowing exactly where the DIY line is.
Safety first, non-negotiable: never put your hand inside a garbage disposal, even when you are “sure” it is off. Switches get flipped accidentally, and the grinding mechanism does not care about your intentions. All clearing is done with tools, from above, with the power verified off. If any step here involves wiring beyond a plug or a reset button, that is electrician territory — this guide will tell you clearly when you have reached it.
Safety setup before you touch anything
- Turn the wall switch OFF. Tape it in the off position or have someone stand guard — accidental activation during jam clearing is how injuries happen.
- Unplug the disposal if it has a plug under the sink. If it is hardwired (no plug), turn off the breaker for the disposal circuit and verify with a non-contact voltage tester if you have one.
- Never reach in. Use tongs, pliers, or a wooden spoon handle to retrieve objects. Your fingers never enter the chamber.
These rules are absolute, not suggestions. Every year, emergency rooms treat thousands of disposal-related hand injuries, virtually all from reaching into the unit. Tools only, power verified off, every time.
Symptom 1: It hums but does not grind (jammed)
The hum means the motor is getting power but cannot turn — something is wedged between the impellers and the grind ring. This is the most common disposal problem and the easiest fix:
- With power OFF and verified, shine a flashlight into the chamber and look for the obstruction — often a bone fragment, a piece of glass, a bottle cap, or fibrous material wrapped around the mechanism.
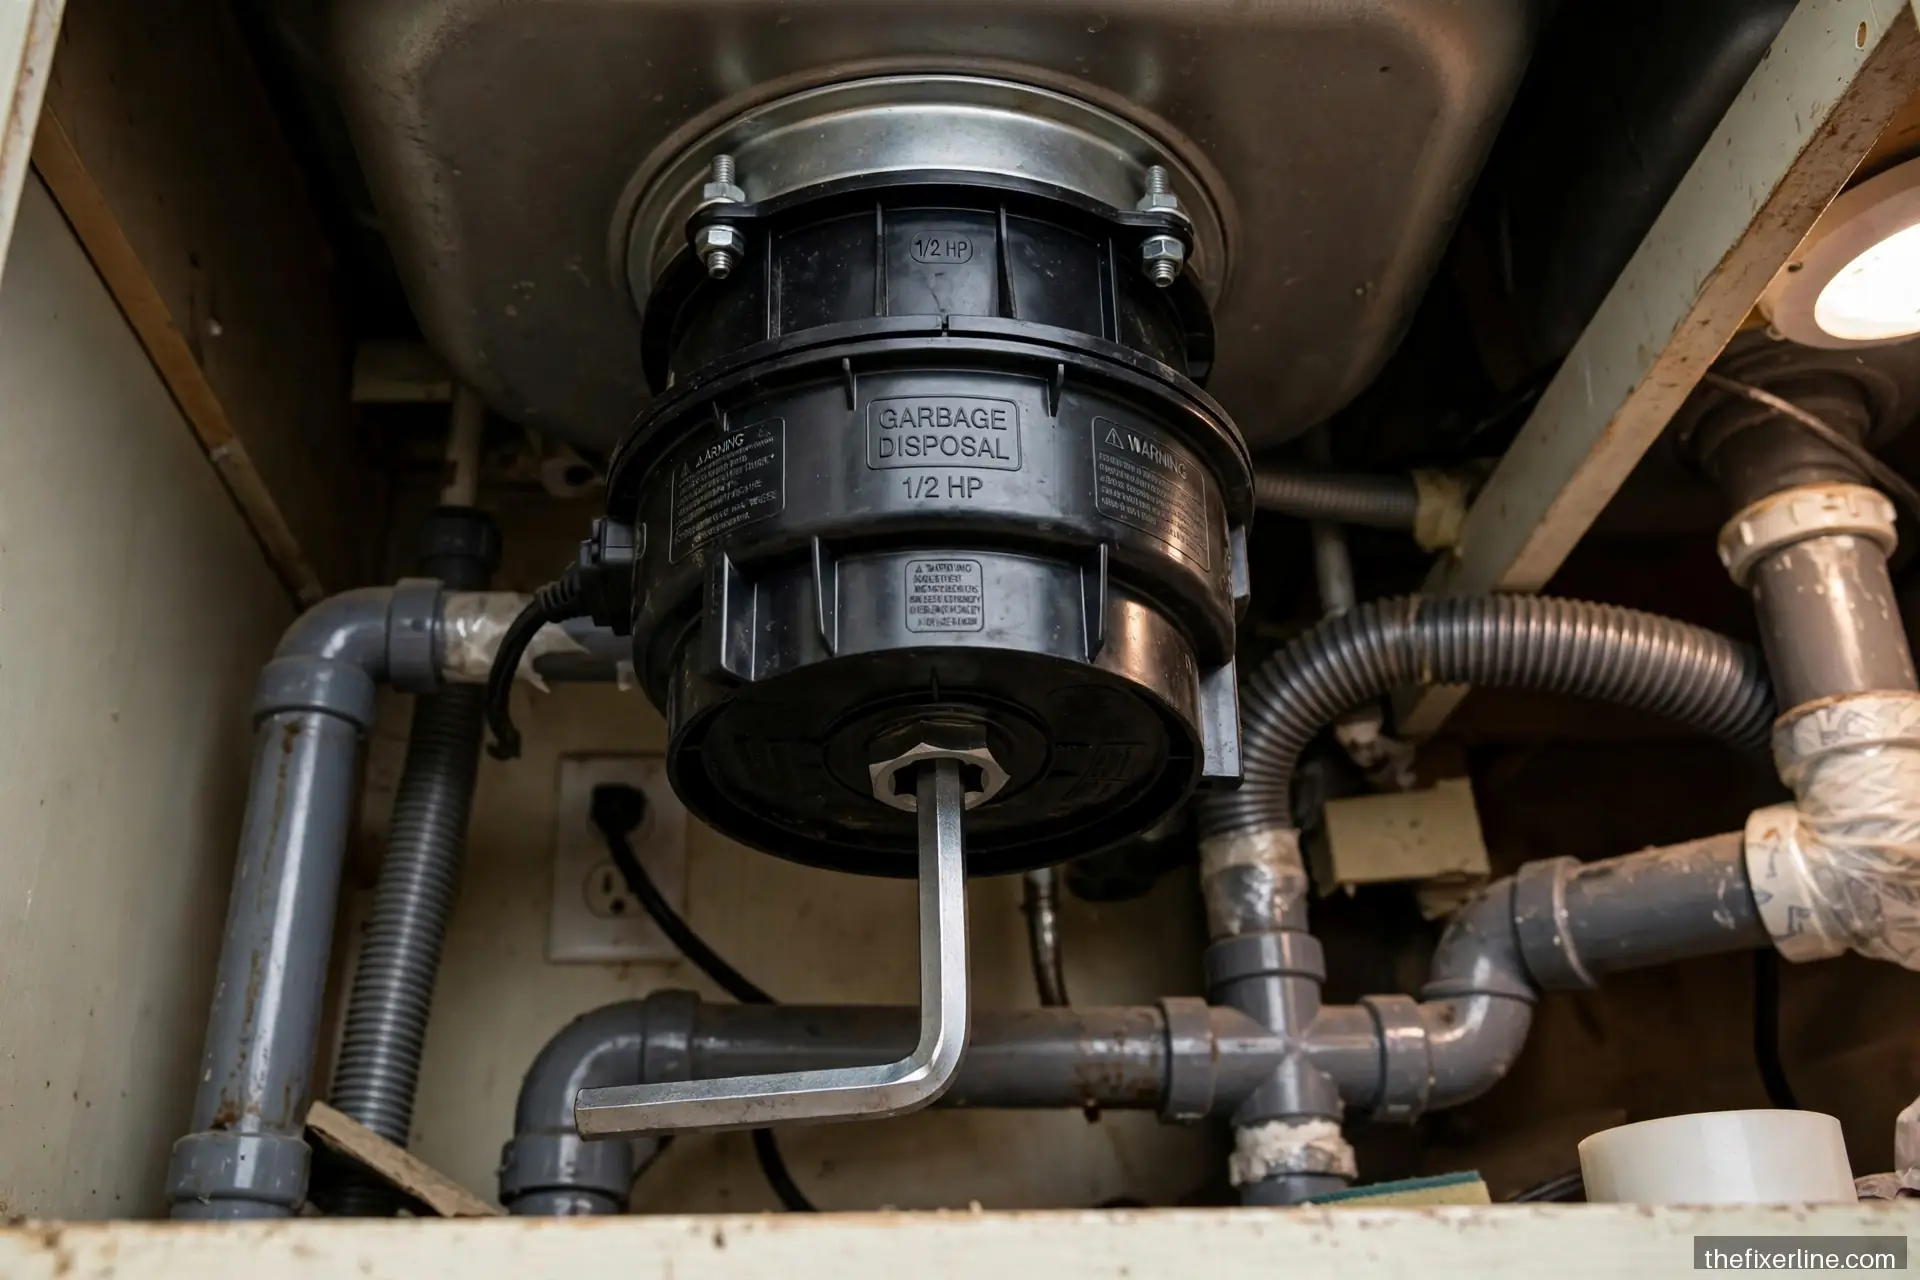
- Insert the hex wrench (the Allen key that came with the disposal — check the small pouch taped to the unit or your junk drawer) into the hex socket on the bottom of the disposal. Work it back and forth firmly. This manually rotates the motor and usually dislodges the jam — you will feel it break free.
- Remove the loosened debris from above with tongs or pliers.
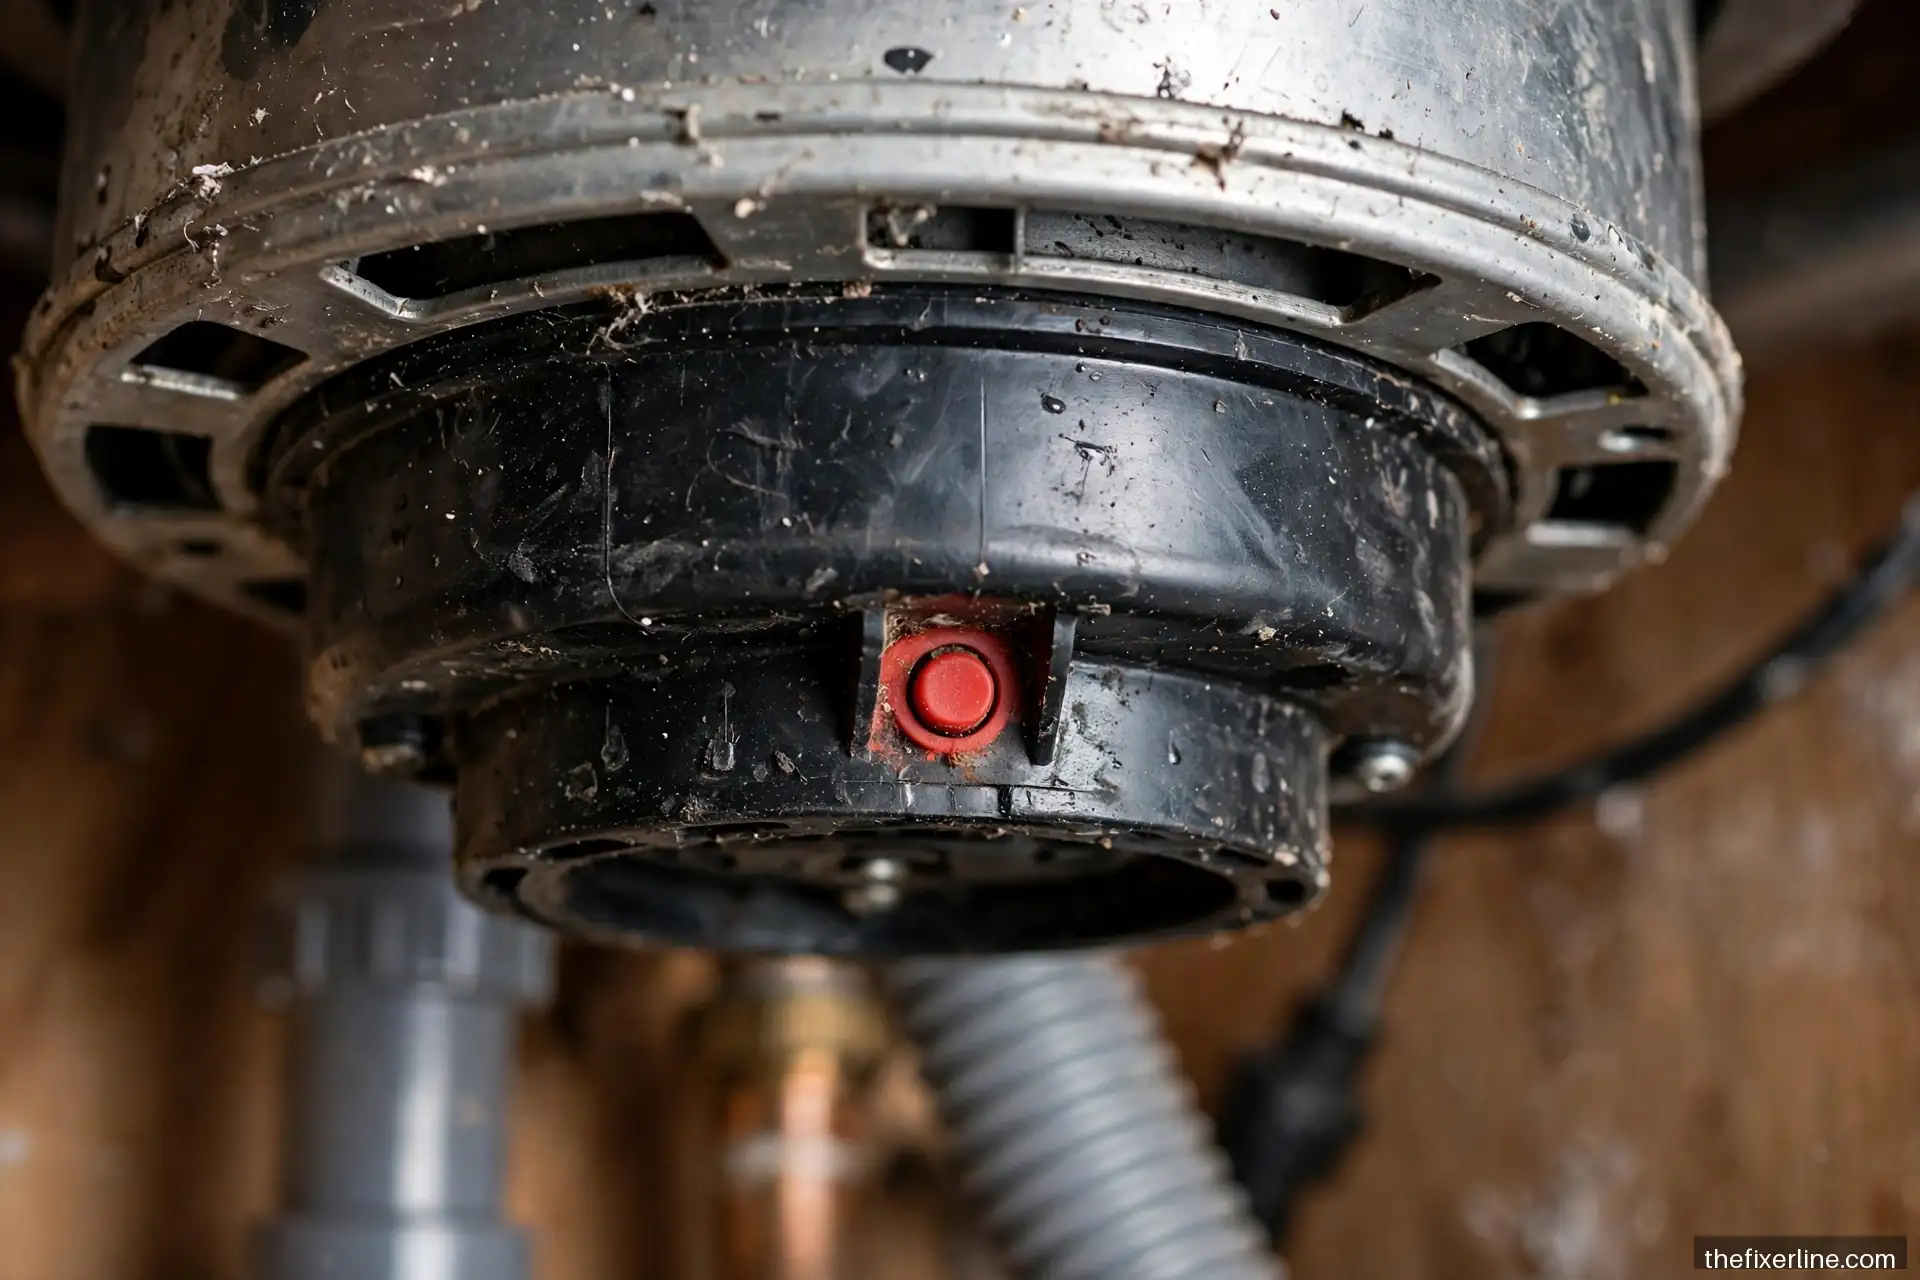
- Press the red reset button on the bottom of the unit (it trips when the motor overheats from jamming). Restore power and test with cold water running.
If the hex wrench will not budge the mechanism at all, the jam may be severe or the motor seized — try once more with firm pressure, but do not force it to the point of damaging the socket. A truly frozen motor on an older unit often means replacement is the sensible path.
Symptom 2: Completely dead (no sound at all)
Work through this checklist in order:
- Reset button: press the red reset on the bottom of the unit. Overload trips are the number one cause of “dead” disposals.
- Breaker: check your electrical panel for a tripped breaker on the disposal circuit. Reset it once. If it trips again immediately, stop — that indicates an electrical fault, and you need an electrician.
- GFCI: if the disposal plugs into a GFCI outlet (common under sinks), check whether the GFCI has tripped and reset it.
- Wall switch: switches fail. If everything above checks out and a non-contact tester shows no power reaching the unit with the switch on, the switch itself may need replacement — a straightforward job for anyone comfortable with basic electrical work, or a quick electrician visit.
If power reaches the unit (breaker fine, reset done) and it is still completely silent, the motor has likely failed. On a unit more than 8–10 years old, replacement is usually more economical than motor repair.
Symptom 3: Leaking from the disposal
Identify where it leaks — the fix depends entirely on location:
- Top (where it meets the sink): the sink flange seal has failed. This requires removing the disposal and reseating the flange with fresh plumber’s putty — a moderate DIY job, or a plumber’s hour.
- Side (dishwasher connection): the dishwasher drain hose connection is loose or its clamp has failed. Tighten or replace the clamp — easy.
- Bottom: the internal seals have failed. This is generally not repairable — the unit needs replacement. Bottom leaks mean water inside the motor housing, which is both an electrical concern and a sign of end-of-life.
- Drain pipe connections: loose slip nuts or worn washers — the same fixes as any under-sink joint; see our leaky pipe joint guide.
Symptom 4: Slow draining or frequent clogs
If the disposal runs but the sink drains slowly, the problem is usually downstream — a partial clog in the drain line, not the disposal itself. Run the disposal with plenty of cold water (cold solidifies grease so the disposal can chop it; hot melts grease that then re-solidifies downstream — this is the opposite of what most people assume). If slow drainage persists, the drain line needs clearing — see our drain unclogging guide for the mechanical methods. Note: never use chemical drain cleaners in a disposal — they damage the seals and create a hazardous splash risk.
What not to put in a disposal (prevention)
Most jams are user error. Never put in: fibrous foods (celery, artichokes, corn husks, onion skins — they wrap around the mechanism), grease and oil (solidifies downstream), coffee grounds in quantity (they pack into sludge), bones, pits, and shells (too hard — they jam or dull the impellers), pasta, rice, and starchy foods (expand with water into paste), and non-food items obviously. Do: run cold water before, during, and 15 seconds after grinding; feed waste gradually, not all at once; and grind small ice cubes occasionally — the old advice says it sharpens, but what it really does is scour the chamber clean, which is valuable anyway.
Repair vs. replace: the decision
Consider replacement when: the unit is 10+ years old and the motor is failing; it leaks from the bottom (internal seals); the grinding chamber is cracked or severely corroded; or repair costs approach half the price of a new unit. Replacement is a moderate DIY job (disconnect, unmount, remount, reconnect — no new wiring if the existing circuit is sound) or a standard plumber/electrician visit. When buying new, match the horsepower to your use (heavier use = higher HP, which also means quieter operation under load) and check that the mounting assembly matches your sink — most use a standard 3-bolt mount.
When to call an electrician or plumber
Call an electrician for: breakers that trip repeatedly, any wiring work beyond a plug or switch, burning smells from the motor (unplug immediately and do not use it), or a hardwired unit you are not comfortable isolating. Call a plumber for: flange reseating if you are not comfortable removing the unit, persistent drain-line clogs downstream, or replacement if the plumbing configuration is unusual. For the broader framework on professional-vs-DIY boundaries, see 10 home repairs you should never DIY.
Hardwired vs. plug-in: what you have and why it matters
Disposals connect to power in two ways, and knowing which you have determines what you can safely do. Plug-in units connect to an outlet under the sink — you can fully de-energize the unit by unplugging it, which makes jam clearing and reset procedures straightforward and safe. Hardwired units connect directly to house wiring through a junction box on the unit — de-energizing requires the breaker, and you should verify with a non-contact voltage tester before touching anything. If you are replacing a hardwired unit and the new one comes with a cord, or vice versa, the conversion involves wiring work that many homeowners reasonably leave to an electrician — it is a short visit and removes all doubt. When in doubt about any electrical connection, the cost of a professional is trivial compared to the risk of getting it wrong.
Extending your disposal’s lifespan
A disposal that is used correctly lasts 10–15 years; one that is abused lasts half that. Beyond the “do not grind” list above, three habits matter most. First, always run cold water generously — the water carries waste through and keeps the motor cool; dry grinding overheats the motor and trips the overload. Second, run it regularly — a disposal that sits unused for months can seize as internal parts corrode slightly; a weekly 30-second run with water keeps it free. Third, do not use chemical cleaners — they attack the rubber and plastic components and create hazardous conditions for anyone who later works on the unit. If the disposal develops a persistent wobble or the mounting assembly loosens, tighten the mounting ring (the large ring at the sink flange) — a loose mount stresses the whole assembly and accelerates wear on every connection.
Frequently asked questions
Where is the reset button?
On the bottom of the disposal unit — a small red (sometimes black) button. You may need to feel for it. Press it firmly; if it clicks, it had tripped. If it will not stay in, the motor may still be overheated — wait 10 minutes and try again.
What size hex wrench fits the bottom socket?
Most disposals use a 1/4-inch hex (Allen) wrench — the manufacturer usually includes one with the unit. If yours is lost, a standard 1/4-inch Allen key from any set works. Keep it taped to the disposal or nearby; you will need it again.
Should I run the disposal before the dishwasher?
Yes — dishwashers typically drain through the disposal, so running the disposal briefly before starting the dishwasher ensures the drain path is clear. This is also why a clogged disposal can cause dishwasher drainage problems; see our dishwasher not draining guide.
How do I get rid of disposal odors?
Grind ice cubes and citrus peels with cold water running — the ice scours, the citrus deodorizes. For persistent odor, the rubber splash guard (the flaps at the drain opening) is usually the culprit — scrub its underside with a brush and dish soap; trapped gunk there is the number one odor source. Avoid chemical deodorizers; mechanical cleaning addresses the cause.
What to read next
Keep the kitchen running: dishwasher not draining checks and unclogging drains without chemicals.
Safety note: This article is general information, not professional contractor advice. Never put your hand in a disposal, always verify power is off before clearing jams, and hire a licensed electrician for any wiring work or repeated breaker trips.